How to disassemble your Lytro Camera (Part 2)
 You’re interestd in what secrets hide inside your Lytro LightField Camera? In this post, we’ll show you how you can open and disassemble your camera!
Important note: Please be aware that you can irreparably damage your camera when fiddling around! We can not take responsibility if anything goes wrong.
First, remove the black plastic cover around the lens. It’s held in place with adhesive tape, which means it’ll come off easier on a warm summer’s day.
You may be able to use a thin flat screwdriver as leverage in the tiny gap between the edge of the lens and the cover. Caution, don’t touch your lens!
Once you’ve removed the front cover plate, you can see 4 screws waiting to be removed:
Remove the 4 long screws, and the back part of the camera opens up. It is now only attached to a little hinge:
This picture shows the front lens assembly (aluminium case) and the back part (silicone grip part) with Lytro’s LightField sensor (center square on the green circuit board):
One of the circuit boards from inside the Lytro LightField Camera:
The back section (silicone grip part) of the camera also seems to work when disattached from the lens system, which opens it up to coupling with other optical systems (more on that in a later post):
Lytro LightField Camera, front lens assembly:
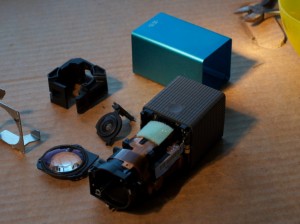
The internal life of a Lytro LightField Camera :
Note: If your camera doesn’t turn on after reassembly, don’t panic. Press and hold the power button for up to a minute to induce a full camera reboot.
Most of the pictures in this blog post were extracted from Josh Reich’s Lytro Camera Hack Slides and tumblr blog.
![First, remove the black plastic cover around the lens. [How to disassemble your Lytro Camera] First, remove the black plastic cover around the lens. [How to disassemble your Lytro Camera]](http://lightfield-forum.com/wordpress/wp-content/uploads/2012/11/how-to-disassemble-lytro-camera-300x199.jpg)
![You may be able to use a thin flat screwdriver as leverage just between the edge of the lens and the plastic cover. [How to disassemble your Lytro Camera] You may be able to use a thin flat screwdriver as leverage just between the edge of the lens and the plastic cover. [How to disassemble your Lytro Camera]](http://lightfield-forum.com/wordpress/wp-content/uploads/2012/12/lytro-disassemble-remove-plastic-cover-300x200.jpg)
![Once you've removed the front cover plate, you can see 4 screws [How to disassemble your Lytro Camera] (photo: Josh Reich) Once you've removed the front cover plate, you can see 4 screws [How to disassemble your Lytro Camera] (photo: Josh Reich)](http://lightfield-forum.com/wordpress/wp-content/uploads/2012/12/lytro-take-apart-i2pi-2-300x224.jpg)
![Remove the 4 long screws, and the back part of the camera opens up. It is still attached to a little hinge. [How to disassemble your Lytro Camera] (photo: Josh Reich) Remove the 4 long screws, and the back part of the camera opens up. It is still attached to a little hinge. [How to disassemble your Lytro Camera] (photo: Josh Reich)](http://lightfield-forum.com/wordpress/wp-content/uploads/2012/12/lytro-take-apart-i2pi-3-300x300.png)
![This picture shows the front lens assembly (aluminium case) and the back part (silicone grip part) with Lytro's LightField sensor (center square on the green circuit board). [How to disassemble your Lytro Camera] (photo: Josh Reich) This picture shows the front lens assembly (aluminium case) and the back part (silicone grip part) with Lytro's LightField sensor (center square on the green circuit board). [How to disassemble your Lytro Camera] (photo: Josh Reich)](http://lightfield-forum.com/wordpress/wp-content/uploads/2012/12/lytro-take-apart-i2pi-4-300x224.jpg)
![One of the circuit boards from inside the Lytro LightField Camera [How to disassemble your Lytro Camera] (photo: Josh Reich) One of the circuit boards from inside the Lytro LightField Camera [How to disassemble your Lytro Camera] (photo: Josh Reich)](http://lightfield-forum.com/wordpress/wp-content/uploads/2012/12/lytro-take-apart-i2pi-6-300x224.jpg)
![The back section (silicone grip part) of the camera also seems to work when disattached from the lens system. [How to disassemble your Lytro Camera] (photo: Josh Reich) The back section (silicone grip part) of the camera also seems to work when disattached from the lens system. [How to disassemble your Lytro Camera] (photo: Josh Reich)](http://lightfield-forum.com/wordpress/wp-content/uploads/2012/12/lytro-take-apart-i2pi-7-300x298.png)
![Lytro LightField Camera, front lens assembly [How to disassemble your Lytro Camera] (photo: Josh Reich) Lytro LightField Camera, front lens assembly [How to disassemble your Lytro Camera] (photo: Josh Reich)](http://lightfield-forum.com/wordpress/wp-content/uploads/2012/12/lytro-take-apart-i2pi-8-300x298.png)


Excellent Markus… Thank you so much!!! I think I will keep my Lytro intact as a had a breakthrough with lens compensation…. idea came while studying and understanding the Harvard Lightfield microscope…
Good one… :) Bit more high resolution pics on the inside structures would have been nice :)
I wish that Lytro would introduce a digital eyepiece with a 30mm, 23mm barrel for microscopes and 1.25″ barrel for telescopes and have it tethered to a USB cable that can be plugged into pc. Let others build their own optic train to suit there own needs… the technology is so advance… more suited for scientific and industrial use rather than consumer markets.