The text and screenshots herein are copies of Lytro’s official support articles, provided here purely to help remaining Lytro camera users experiencing problems. We have only included the most relevant support articles for this purpose.
- Preview & Import
- Using Libraries to manage pictures
- The Info Panel
- Adjustment Panel – Focus Spread, Sharpening, Saturation and more
- Bulk Editing Living Pictures
- Editing Depth Maps
- Using Photoshop Integration
- Adobe Photoshop Compatibility
- Editing Living Pictures with 3rd Party Software (Mac)
Bulk Editing Living Pictures
Preview and Import – Quickstart
1. Take some pictures
2. Connect your camera to, or insert SD card into your computer. Your camera will appear (see a. below)
3. Choose an existing library or create a new one. See b. below
4. Selecting existing or new library (c. below) and processing option (d. below)
5. Import (.f below)your pictures; they will be imported and stored in the library you select.
Preview Options and Features (Desktop 4.3 or higher):

- Camera connected (a.) – When your camera or SD card is connected to your computer, the viewing area switches to Camera View where you can select images to import.
- Double-click or
- Select “Reprocess” (In the ‘Picture’ dropdown
- Right-clicking/CTRL+clicking a thumbnail)
- Once your images have imported, you can organize them in albums, use adjustment tools to edit them, or apply animations.
- Pictures taken in different years
- Pictures taken during a specific photo shoot or event
- Pictures taken in a specific location
Pictures in the Camera View screen are thumbnails only and do not display depth-related features like refocus.
New/All Pictures Toggle (c.) – “New” displays pictures that have not yet been imported; “All Pictures” displays all pictures on your SD card.
Select images to preview
Holding shift and clicking will selected all of the images from the first selected to the last
Holding command (mac) or control (win) will allow you to select multiple pictures individually
Import and Process Pictures:
1. Select pictures you want to import
2. Import to Album… (b.) – Select an album to import them to or create a new album
- Process now or later – The “Process Immediately” checkbox (d.) tells Desktop if you want to process your pictures now or later:
Checked – Processes all pictures as they import into the selected library
Unchecked – Pictures will do a “Fast Import” and can be processed later, when convenient or as needed.
NOTE – Unprocessed preview images don’t have living picture effects such as refocus.
“Delete from Camera” (e.) – controls whether pictures are deleted from your SD card after import.
- NOTE – “Delete after import” is a permanent removal of the pictures from your SD card and they cannot be recovered
3. Import All / Import Selected (f.) – Imports all or selected previewed images on the SD card
- “Import All” appears when no thumbnails are selected.
“Import Selected” [Mac] or “Import X pictures” [Windows] appears when you have images selected.
4. Your pictures will appear one at a time in the selected Library.
If you didn’t process your images as they import, you’ll need to process them one at a time to view living picture effects. Initiate processing via:
Notes:
When in doubt, we recommend importing pictures from your camera instead of deleting them. The depth features that are unique to the Lytro experience will often reveal elements within a scene that cannot be recognized in a 2D thumbnail.
Using Libraries to manage pictures
Introduction
Lytro Desktop 4’s Library module lets you view and manage your living pictures. To access the Library, click on the Library icon on the left hand side of the interface.

The Library is where you can view, sort, rate, flag, and delete pictures. When you open Desktop 4, a dialog box will prompt you to select an existing or create a new library to open Lytro Desktop with.
You can create different libraries to store pictures in, and create albums within those libraries to organize your pictures.
You may wish to maintain separate Lytro Libraries for:
Having your collection of pictures split among multiple Lytro Libraries may also make it easier to manage backups.
Creating a new Lytro Library
From the top-level “File” menu, choose: “File” > “Choose Library…” > “Create New…”
Type in a name for your new Lytro Library and click “Save.”
You can now start importing pictures from your Lytro camera into your new Lytro Library.
Opening two or more Lytro Libraries at once
From the top-level “File” menu, choose “Choose Library…”
[Mac] You will be presented with a list of all recently opened Lytro Libraries and/or those in your Pictures folder.
[Mac] To open a different Lytro Library in another location (e.g. a backup on an external drive), click “Select Other…” and navigate as needed.
Select your desired Lytro Library.
Click “Open.”
You may now perform any normal picture or Album operations within, or across, any open Lytro Library as you wish.
If you wish to open a Lytro Library originally created in Lytro Desktop 3.0.1 and below, you must first migrate your existing Lytro Library as described below.
Migrating an existing Lytro Library (from Lytro Desktop 3.0.1 and below) into Lytro Desktop 4.0
From the top-level “File” menu, choose:
“File” > “Choose Library…” > “Create New…”
Type in a name for your new Lytro Library and click “Save.”
A new, empty Lytro Library will be created.
Within that same empty Lytro Library, from the top-level “File” menu, choose the “Import Library…” option.
Navigate to the location of your desired Lytro Library (from Lytro Desktop 3.0.1 and below).
Mac: Pictures > Lytro (this special folder is known as a ‘package,’ and its full name is “Lytro.lytrolib”)
Click “Open.”
Please be patient! This can be an extremely resource-intensive operation, and it may be a while before you see any changes on-screen.
Migrating a Lytro Library to Lytro Desktop 4.0 is a one-way process!
Although your existing Lytro Library will be retained on your computer, unchanged, in its original location (until or unless you delete it manually), any new pictures you import into Lytro Desktop 4.0 from your Lytro camera in the future will not be able to be imported or viewed with any version below Desktop 4.
Copying pictures from one Lytro Library to another
Make sure you have enough room on the hard disk containing the target (destination) Lytro Library to contain all of the pictures you wish to copy.
Arrange the windows displaying your two Lytro Libraries on your monitor(s) so you can see them both.
Select one or more pictures in your source Lytro Library, just as you would when working with Albums within a single Lytro Library.
Click and drag the selected pictures until you see a semi-transparent grouping of pictures begin to move.

Drag those pictures into the Sidebar of the target (destination) Lytro Library.
With “All Pictures” selected, drop the photos into the thumbnail image previews to create a new Album of those pictures.
To add pictures to an existing Album, drag the group of pictures over the Album name.
The album will illuminate and you can drop the pictures into that album, they will then appear in the selected album as well as in “All Pictures”
NOTE: Please be patient! This can be an extremely resource-intensive operation, and it may be a while before you see any changes on-screen.
Merging two Lytro Libraries
Make sure you have enough room on the hard disk containing the target (destination) Lytro Library to contain the entire source Lytro Library.
Arrange the windows displaying your two Lytro Libraries on your monitor(s) so you can see them both.
Go to the All Pictures view in the source Lytro Library.
Click any picture, then select all pictures using the top-level
“Edit” menu > Select All.
[Mac] Keyboard shortcut: hold “command” (Apple) and press “a.”
Click and drag the selected pictures until you see a semi-transparent grouping of pictures begin to move.

Drag those pictures into the Sidebar of the target (destination) Lytro Library.
NOTE: Please be patient! This can be an extremely resource-intensive operation, and it may be a while before you see any changes on-screen.
If desired, you may then delete the source Lytro Library, although caution dictates preserving all backups indefinitely, whenever you have room available.
Mac: Using Lytro Libraries with non-startup disks
Create a new Lytro Library in Lytro Desktop or choose one that you created previously and want to transfer to a different storage drive.
Open your computer’s ‘Pictures’ folder (Macintosh HD>Pictures).
In this folder you will find the Lytro Library file, which has that libraries name and the extension ‘.lytrolibrary’ as the file name.(Lytro Desktop’s default save location)

Click and drag the selected library file to the newly desired storage location. (This could take a very long time if you have a lot of living pictures in your library)
Once the file has finished transferring, launch Lytro Desktop on your computer.
When the ‘Open Library…’ window automatically opens on launch, click ‘Select Other…’ and locate the library in its new location.
If Lytro Desktop is already open, or if the ‘Open Library…’ window does not automatically open on launch, please select File > ‘Open Library…’ from the top bar.
Once the desired library is selected, click ‘Open’.
The Lytro Library should now open in Lytro Desktop from its new storage location
The Info Panel
The INFO panel in Desktop 4 displays information about the capture settings used for the selected image. To access Info, select an image by clicking on its thumbnail from any of Desktop 4’s view modes . Then, click the “INFO” icon in the sidebar on the left hand side of the interface.

This will open the INFO panel:
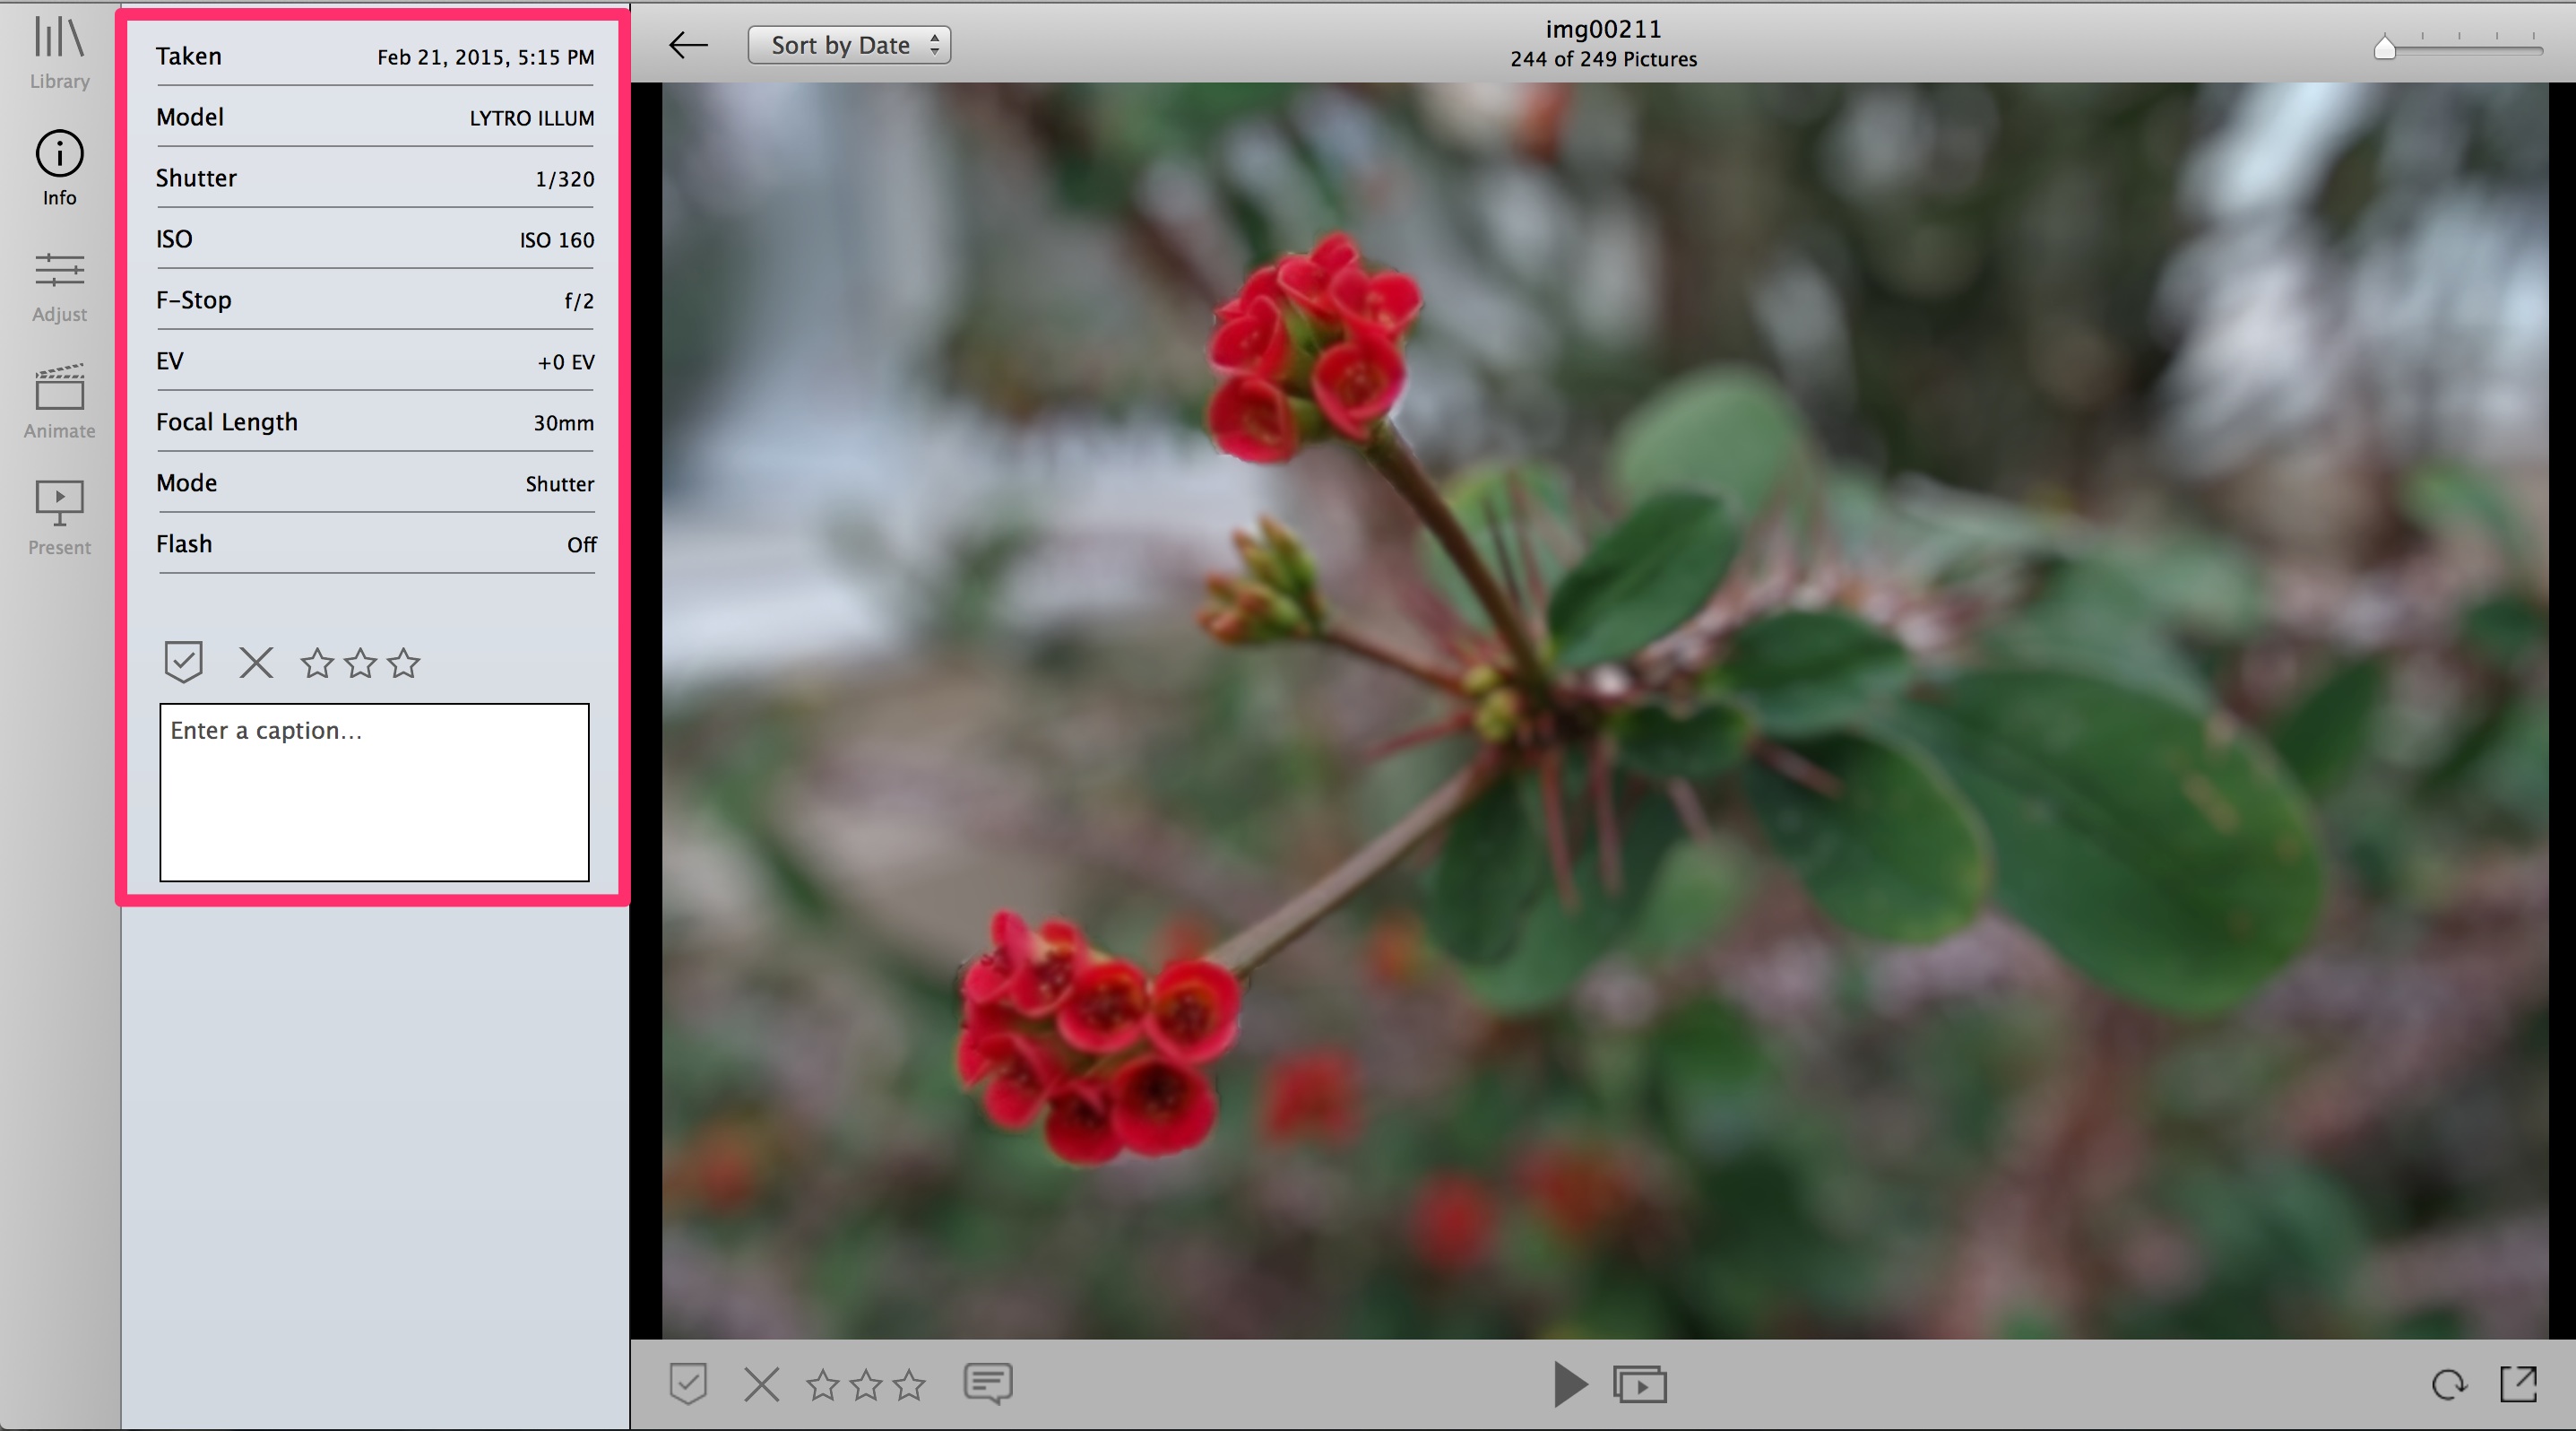
The Info panel displays the following:
- File Name (a.): Filename of the selected living picture
RAW File (b.): Displays if an image is a RAW file
Interactive (c.): Displays if an image is interactive or not
Taken (d.): Date and time the picture was captured
Model (e.): Camera model (ILLUM or First Generation)
Shutter (f.): Shutter speed used for the exposure
ISO (g.): ISO setting used for the exposure
F-Stop (h.): Aperture used for the exposure
EV (i.): Exposure Value setting used for the exposure. If no Exposure Compensation was used, this will be 0
Focal Length (j.): Focal length of the lens at the time of capture (35mm equivalent)
Mode (k.): Capture mode that the camera was in at time of capture.
Flash (l.): ILLUM Only. Flash metadata for the Lytro compatible TTL Flash when it is used during capture.
Flag (m.): If an image has been flagged, this icon will be illuminated. Flag an image by clicking on the icon, click on the icon again remove a flag. Flagging lets you mark images temporarily.
Reject (n.): Rejected images will have the “x” illuminated. Click on the X to mark the selected image as rejected.
Rating (o.): The rating of a selected image. Click one, two, or three stars to rate the image.
Caption (p.): Image caption. Click in the box and type to add an image caption. Hit Enter or Return to apply the caption.
Adjustment Panel – Focus Spread, Sharpening, Saturation and more
Desktop 4’s “Adjust” Panel contains image adjustment tools for enhancing or correcting your living pictures.
To access the “Adjust” tools, click on the “Adjust” Icon on the left navbar:

This will open the Adjust panel and display available adjustment sections.
Select the image you want to Adjust by clicking on it.
Sections may be minimized by clicking on the section header.
To use the adjustment tools, drag the sliders to the left or right.
You can also click on the numeric value displayed next to each slider option and type in a value.
Hit “Enter” or “Return” to apply a typed-in value.
At the bottom of the panel, select “Revert to Original” at any time to reset all settings for a selected image to that of it’s original capture
Use “Undo,” also at the bottom of the panel, to undo a single change
Changes are automatically saved as they are applied. If you do not want to keep the changes you have made to an image, click “Revert to Original”
Adjust Sections
The Adjust Panel has six sections: Histogram, Color, Virtual Camera, Details, Framing, and Depth Map Editor which we’ll go over individually below.
Histogram
Provides a real-time graphical representation of the tonal range of all the pixels of your image.

Color
The Color controls feature image editing tools for adjusting or enhancing your living pictures.

- [A] White Balance – Use the drop down to select white balance. Available choices mirror those in camera, with the addition of “As Shot” and “Custom”
- Temperature – Dragging the temperature slider to the left will cool the image, to the right will warm the image
Tint – Use tint to correct for fluorescent lighting
Eyedropper – select a region to set the custom white balance.
- [B] Tone: Exposure and tonality adjustments can be made using these sliders. Double click the numeric value on the right for manual entry; Enter “0” for default value.
- Exposure – Increase or decrease the exposure of the selected living picture by dragging the slider to the right or left.
Contrast – Increase or decrease the contrast in the selected living picture by dragging the slider to the right or left.
Highlights – Increase or decrease the tonality of the highlights in a selected living picture by dragging the slider to the right or left. This will brighten or darken the highlights in the image.
Use this slider to recover blown out areas in an over exposed image, if possible.
If the image is over exposed to the point where no data was captured, you will not be able to recover the highlights in the image, and won’t see a change when moving the slider to the left.
Shadows – Increase or decrease the tonality of the shadows in a selected living picture by dragging the slider to the right or left. This will brighten or darken the shadows in the image.
Use this slider to recover under exposed areas in an image, if possible.
If the image is under exposed to the point where no data was captured, you may not be able to recover detail information in the shadows. In this case, when you move the slider to the right, the blacks will turn grey.
Whites – Increase or decrease the tonality of the white tones in a selected living picture by dragging the slider to the right or left. This will brighten the whites in the image
Blacks – Increase or decrease the tonality of the black tones in the selected living picture by dragging the slider to the right or left. This will lighten or darken the black tones
Auto Tone – when selected, attempts to adjust exposure and black levels to be more accurate and visually pleasing
- [C] Saturation
- Vibrance – Vibrance adds contrast and saturation to the more muted tones in an image, without affecting more saturated colors.
Saturation – Dragging this slider to the right will add saturation
Tip – Drag this slider all the way to the left, or manually enter -100, to remove all saturation and make your image black and white
Color Specific Saturation options (Red, Yellow, Green, Cyan, Blue, Magenta) – Increase or decrease specific color channels from your picture
Virtual Camera
Virtual Camera controls allow you to adjust the aperture and perspective of your image after capture. The Virtual Camera panel has four sections: Aperture, Depth Map, Focus Spread, and Tilt which we’ll go over individually below.

- [A] Aperture:
- The Aperture slider gives you “virtual aperture control” with an available range of (simulated) f/1 to f/16.
Drag the slider to the left to decrease depth of field and bring more of the image into focus
Drag the slider to the right to increase depth of field, making more of the picture appear out of focus or soft
- [B] Depth Map: Use the Depth Map feature to reveal the underlying depthmap, which controls what happens when you click on different areas of your living picture.
TIP – Use depthmap view to quickly identify depthmap errors, which can be repaired in postproduction.
We offer 4 Depthmap options:
- Off – Turns the depthmap view off
Greyscale – Displays a greyscale view of the depthmap, with darker being closer and lighter being further
Two Tone – Displays depth in gradations of blue (foreground) to orange (background)
Depth Assist – ‘Depth Assist’ checkbox in Focus Spread section must be checked. Click on an area in your picture; the space in front of your click will render blue, while space behind your click will render orange.
Opacity – controls transparency of the Greyscale, Two Tone, and Depth Assist depthmap overlays.
- [C] Focus Spread: This tool enables you to pinpoint exactly at which depths the focus begins and ends in an image — like having two apertures in a single picture. For example, create a living picture with beautiful f/1.0 bokeh in the foreground and background while maintaining f/16 sharpness on the primary subjects with a single exposure. Please see our video tutorial for how to use this tool.
- Use the “Depth Assist” checkbox to reveal Depth Assist depthmap overlay
Use forground (blue) or background (orange) eyedroppers to quickly select foreground and background focus spread
Drag the foreground (blue) or background (orange) triangles to adjust focus spread
You can also use the Focus Spread toggle control (see diagram above) in the upper right to enable/disable negative focus spread. When overlapped as in this diagram, negative focus spread is disabled. Click once to enable.
- [D] Tilt: This tool allows you to adjust the perspective of your image after capture. Conceptually, these are similar to the way tilt would work in a tilt-shift lens: think of your image tilting or rotating along a horizontal or vertical axis. Visualization has been added to display depth and focus
- Tilt – Drag to the left or right to tilt the image around the focal plane. This will decrease depth of field. Use tilt to isolate a subject in a scene.
Rotation – Drag to the left or right to rotate the image around the focal plane. This will decrease depth of field.
Details
Adjust sharpening and remove noise

- [A] Detail Crosshair Target
Click on the crosshair target icon in the upper left corner, then click on the area of your photo you want closeup detail. The detail display box will highlight a 1x or 2x view of your selection.
- [B] Sharpening:
- Amount – Add or remove sharpening (edge contrast)
Radius – Adjust the radius that sharpening is applied to
Detail – Brings out finer textures of images by controlling how high frequency data is displayed.
Masking – Limits sharpening to more pronounced edges.
- [C] Noise Reduction
- Luminance: Add or remove luminance noise with this slider. Luminance noise is variation in brightness
Color – Use this slider to add or remove color noise
- [D] Defringe
When selected, attempts to remove color fringing artifacts. The Radius and Threshold sliders will effect intensity and effectiveness in different scenarios
- [E] Lens Flare Reduction
When selected, attempts to reduce lens flare artifacts
Framing

- Crop
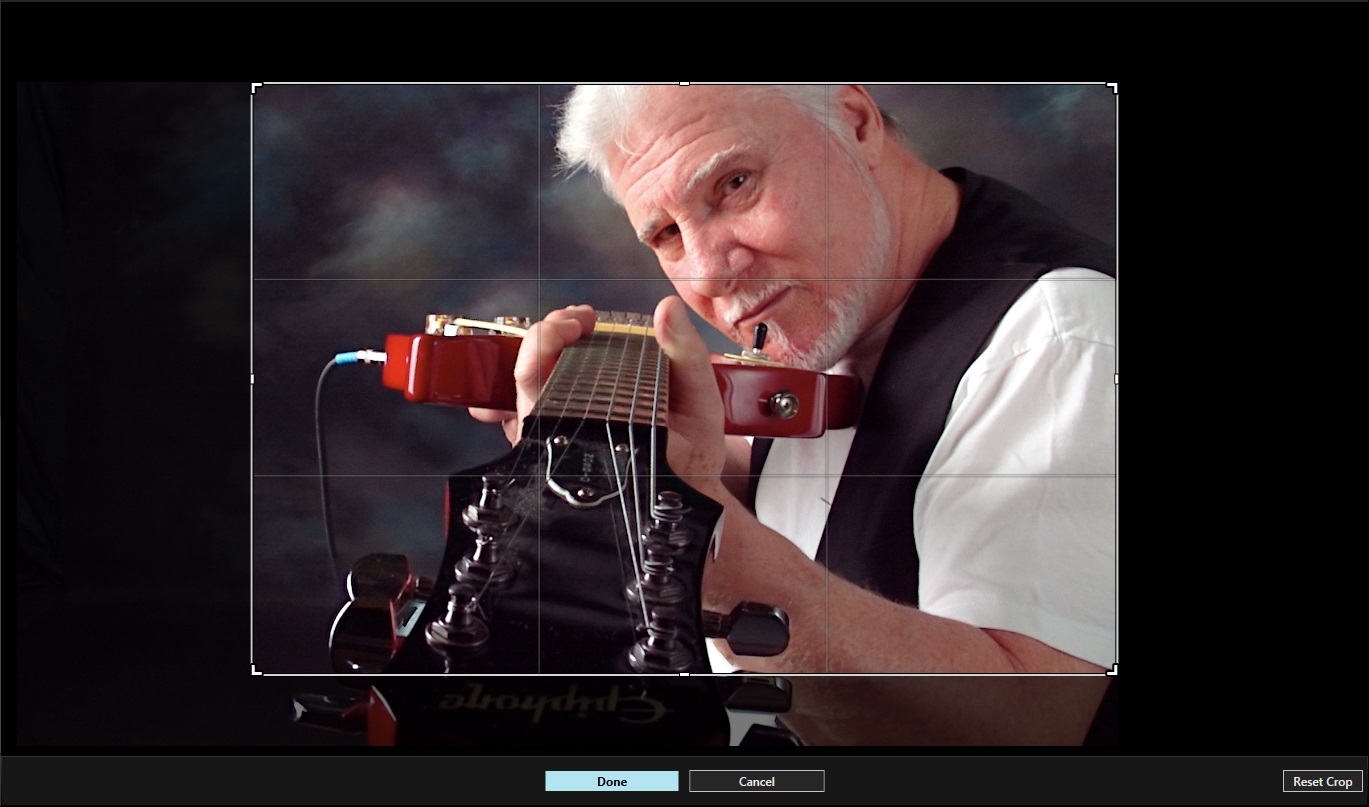
- Edit Crop – Click to use the crop tool. An image crop border will appear. Click and drag the border to adjust the crop
Aspect – drop down menu to select predefined aspect ratios
Checking the “Constrain” box will retain the original aspect ratio
Click and drag on the white box boundary to adjust ratio
Click and drag on area inside the white box boundary to pan
Rotation – rotate the image
Double click the number on the right hand side of the slider to enter a numeric value; use ‘0’ for no rotation adjustment
Click on the outside yellow box to rotate with your pointing device
Done – apply the crop to the image
Cancel – cancel cropping without applying the changes and exit crop mode
Reset – reset to original image without exiting crop mode
Bulk Editing Living Pictures
This article explains how you can make adjustments to multiple living pictures in Lytro Desktop 4 at the same time.
Open Lytro Desktop 4
Double click on a living pictures to view it in ‘Filmstrip View’
Click on ‘Adjust’ and make the desired adjustments to your living picture
Go back into ‘Thumbnail View’ and right-click/ctrl+click the thumbnail of the living picture you just edited
Select ‘Copy Adjustments’ from the sub-menu

Select or deselect the adjustments you want copied and select ‘Copy’

Click and drag to select the thumbnails of images to which you wish to apply the selected adjustments
Once selected, right-click/ctrl+click one of the selected thumbnails and select ‘Paste Adjustments’

Your adjustments will be applied to all selected living pictures
Editing Depth Maps
Desktop 4.3 allows you to edit the depthmap directly, without 3rd party tools.
To launch the Depthmap Editor:
Open Lytro Desktop
Select a thumbnail and open it in single picture view
Click on Adjust and scroll to the bottom of the menu to the Depth Map Editor section
Click Edit in the upper right hand corner of the Depth Map Editor menu
Once you have made the desired edits to the depthmap click Done to save the changes

The Depthmap Editor
Undo (a.) – Go back a step when editing
Redo (b.) – Cancel an undo. Useful for evaluating an edit
Save and Process (c.) – Save and process changes to the depth map.
WARNING – Saved changes are not reversible.
Paint Brush (d.) – Draw on the depth map using selected brush and color attributes.
Blur Brush (e.) – Blends portions of the depth map to create softer edges.
Undo Brush (f.) – Erases changes made with the paint and blur brushes.
Radius (g.) – Controls the size of the editing brush
Hardness (h.) – Controls how feathered the edges of the brush will be
Opacity (i.) – Controls brush transparency
Blur (j.) – When the ‘Blur Brush’ is selected, controls the intensity of blurring.
Brush Preview (k.) – Displays a sample representation of the current brush settings.
Color Selector (l.) – Select the color for the paintbrush tool. The Histogram shows peaks when a color is present in the depth map to help you select the correct/desired shade.
Depth Map Opacity (m.) – determines the opacity of the depth map over your living picture.
Far Right – All depthmap, no picture
Far Left – All picture, no depthmap
Depth Map Selector (n.) – Select between a Black and White, Only Blue, Only Orange, or Blue and Orange depth maps.
Depth Map Expander (o.) – Click this tool to visually expand your images histogram information across the full range of the depth map. This tool assists editors by further differentiating the colors/shades in an images depth map to make editing easier and more accurate.
Clicking ‘Cancel’ will exit the depth map editor
Clicking ‘Reset’ will undo all unsaved changes
Clicking ‘Done’ will save and exit the depth map editor, changes made to the depthmap will take effect immediately.
Using Photoshop Integration
To use Lytro Desktop’s integrated Adobe Photoshop feature, you must have Adobe Photoshop CC 2014 installed on your computer. If you are using another version of Photoshop click here. Click here if you experience any issues using the built-in Photoshop plug-in.
Using Lytro Desktop’s integrated Photoshop feature:
1. Select a living picture that you want to edit in Photoshop and open it in ‘Single Picture’ view.
2. In the top bar click ‘Picture’ and select ‘Edit in Photoshop’
If the ‘Edit in Photoshop’ selection is greyed out, it usually because an unsupported version of Photoshop is installed on the machine (Photoshop CC 2014 is required).
3. The first time using this tool you will need to install the Lytro plug-in for Photoshop, when prompted select ‘Yes’.

4. Your living picture will open in Adobe Photoshop.

5. If you are making global adjustments – adjustments that affect the entire image – like contrast or saturation – you’ll want to make sure that they are exactly the same for each layer (except for the Depth Map). You can make global adjustments by creating an adjustment layer from any of the picture layers, and then dragging the adjustment layer to the top of the list above the depth map (the depth map will not be effected).
You can apply any edits you would regularly use in external editing software. We recommend applying the same changes across all 7 image layers for the living picture to reimport correctly.
6. When you are finished adjusting your image click on ‘File’, go down to ‘Scripts’, and select ‘Export to Lytro Desktop’

Once processing is complete your changes will be reflected by the living picture in Lytro Desktop.
Adobe Photoshop Compatibility
Some users may see an “Unable to Edit in Photoshop” error.
To take advantage of Lytro Desktop’s built-in Photoshop editing integration you must have Adobe Photoshop CC 2014 installed on your computer.
Earlier and later versions of Adobe Photoshop are not compatible with the Lytro Desktop built-in Photoshop plug-in.
If you are running a different version of Photoshop, you have two options to enable adjustments of your living pictures in Adobe Photoshop:
1. Use our manual instructions for editing your living pictures in Lytro Desktop.
2. Downgrade/upgrade Adobe Photoshop to CC 2014 (which is confirmed to be compatible with our plug-in).
Users running older versions of Photoshop will see the menu selection to “Edit in Photoshop” greyed out, whereas users running the latest version will see the error message in the attachment below.

Users with Adobe Photoshop CC 2014 installed can use Lytro Desktop’s built-in Photoshop integration.
Editing Living Pictures with 3rd Party Software (Mac)
Lytro Desktop 4 also supports an export and reimport workflow that allows you to edit living pictures in 3rd party editing software. You can edit in any 3rd party program which supports editing TIFF (.tif) files.
First, import and select the image or images that you want to edit in your 3rd party software into Desktop 4. You must make any desired depth map edits and adjustment changes (in the adjust panel) in Desktop 4 FIRST before making any 3rd party edits. Animations can be applied after re-importing your edited living picture.
1. Select the thumbnail of the living picture that you want to edit from any of Desktop 4’s viewing modes
2. Navigate to the “File” menu and select “Export”
the Export dialog box will open
3. Type in the desired prefix for your exported pictures, e.g. “IMG_2014_July_31_EDIT_” or “PictureName”
4. Select a destination in the “Where” drop down menu for the exported file. Within the chosen destination, Desktop 4 will automatically create a new folder for the exported files.
5. Choose Editable Living Picture from the “Export Format” drop down menu
6. Click “Export”

7. This will generate 7 .tif images, known as a TIFF stack, and a stack lfp (stack.lfp) file
Once you have exported these images, you CAN NOT re-name the images – the TIFF files or the stack.lfp file. If you change the naming convention, re-importing to a living picture in Desktop 4 will not work
You can not change the folder structure – the 7 tiff stack images and the stack lfp file MUST remain together in the SAME FOLDER for the export – reimport process to work.
8. Quit Desktop 4 via “File -> Quit”
In some situations, you may want or need to also edit the living pictures depth map. Instructions on editing the depth map are available here
Once all of your files are exported, you are ready to edit them in your choice of 3rd party software. You’ll need a software program that can edit 16bit TIFF files in ProPhoto RGB.
1. Open your choice of editing program, such as Lightroom
2. Open the 7 TIFF images from the folder with the file name that does NOT say “original” (is ONLY the file name), and make desired changes.
2.1 If you are making global adjustments – adjustments that affect the entire image – like contrast or saturation – you’ll want to make sure that they are exactly the same for each TIFF image. You can do this by duplicating the adjustment layer to the additional TIFF files using the “duplicate layer” option in Photoshop or
2.2 Batch processing (in Photoshop)
2.3 Or choosing “Sync” in Lightroom
3. You can apply any edits you would regularly use in external editing software. We recommend applying the same changes across all 7 images for the living picture to reimport correctly.

1. Make sure you are editing 16 bit TIFF images in the ProPhoto RGB colorspace.
2. In Photoshop, flatten your images.
3. When you are finished making changes, save all of your files (choose “save” via the file menu or by hitting command s). Do not change the file names.
4. Changes should write back to the files – if you get an export or save setting menu in Photoshop, you probably still have a layered image, which you need to flatten, or chose “save as” instead of save. Make sure your image is flattened and that you are choosing “save.”
5. In Lightroom, export the images, unchecking all boxes, and selecting “original” for all drop down menu options.
5.1 NOTE: You will have to change the Lightroom option for “Existing Files” to “Overwrite Originals WITHOUT WARNING” or you will get an error message when trying to export. Make sure to change this back once you are finished!
5.2 If you are getting an error message, you most likely need to change the above option
After saving the changes to the stack lfp files open Desktop 4 to reimport the files and recreate your living picture.
1. Go to “File” and choose “Import from folder”
2. Navigate to the folder with your edited tiff files, and select the folder
note, you must choose a folder, you can not import individual images
3. Click “Open”
4. Your living picture will be imported with the edits you made applied
Original:

Edited:


Recent Comments