The text and screenshots herein are copies of Lytro’s official support articles, provided here purely to help remaining Lytro camera users experiencing problems. We have only included the most relevant support articles for this purpose.
- Animate Living Pictures
- Presentation Mode
- Exporting
- Duplicating Living Pictures
- Exporting Animations
- Lenticular Printing
- 3D Output Overview
Animate Living Pictures
The Animate tool in Lytro Desktop 4 is designed to allow you to easily add animations to your living pictures. Available animations include transitions through various combinations of focus, pan, zoom, perspective, aperture, and tilt, which you can use to direct viewers through your living pictures as you’d like them to be viewed.
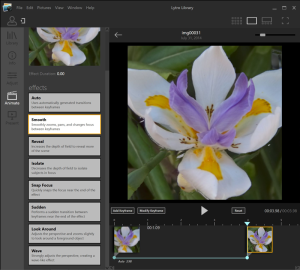
To access the animation tools, click on the Animate icon in the Sidebar of Desktop. This will open the animate panel.
Animations are added from the left-hand panel, and modified using keyframes. The animation panel will open with the currently selected living picture. Living pictures have a starting and ending keyframe, by default, displayed in the timeline.
When a living picture is opened in the animation panel, the starting and ending keyframes will be displayed by default.
To add an animation, first, select the starting point for your animation by clicking on the first keyframe in the timeline. Then, click on the animation that you want to add from the available options:
- Select a keyframe by clicking on it in the timeline, and then click on an animation option to add it to the selected living picture
Click and drag keyframes to adjust the playing time of the selected animation
Click the Play icon in the middle above the timeline to view the animation
Manually add changes by adding and modifying keyframes
- Click Add Keyframe to add a Keyframe
Click and drag to move your living picture within the frame, or
Click to refocus, or
Zoom using the zoom slider or mouse wheel
Then click Modify Keyframe to save the change into the animation
This will allow you to manually modify the animation effects, so that you can choose framing and focus as the animation plays
Add and modify as many keyframes as desired
To remove a Keyframe, click on it and click “Delete” on your keyboard
Only one animation can be applied at a time
When you add or modify an animation, changes will be automatically saved to that living picture’s timeline, and available the next time you open it in the “Animate” panel
To view an animation, in the Library mode click the “Play” icon
To share animated living pictures, you can upload them to your Lytro Web gallery at pictures.lytro.com (you’ll need to create an account, if you haven’t done so already), where viewers will see a play button icon available to click and view the animation. For detailed instructions on sharing to Lytro Web, see: Desktop 4 – Sharing
You can also export your animation as a movie file: from the File menu, choose Export Animation as Movie. Name your movie, and choose the size (720p or 1080p), quality (fast or best), and compression options. For detailed instructions on exporting animations, see: Desktop 4 – Exporting Animations
Note: Fast is the recommended setting for exporting animations as movies. The quality in the fast and best settings are comparable, but processing times will be very long for best-quality rendering, even on high-performance machines.
Presentation Mode
Presentation mode allows you to display your living pictures in fullscreen mode so you can present a slideshow to friends and family. Use an album, choose a view, or flag a set of pictures and you’re ready to go!
Presentation Mode – Making it Happen
You can start your presentation from any collection of pictures you like: either a view (all pictures, flagged pictures, etc) or an album.
NOTE: Your presentation will always begin from the selected picture in that album or view.
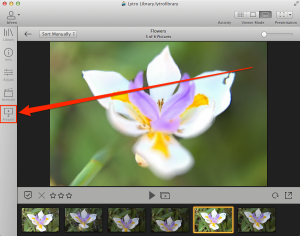
- Click on the Presentation Mode icon:
Choose what kind of presentation you want to have: 2D or 3D (anaglyph or side-by-side):
Choose which display the presentation will output to:
Click on the ‘Begin Presentation” button and you’re in business!
Exporting
You can export pictures from any of the three picture Viewer Modes (Thumbnail Grid, Individual Picture, Filmstrip) that Lytro Desktop 4 offers.
Supported Export Types
Desktop 4 supports the following export types:
- 2D formats
Refocused Image (.jpg) – Choose a focus point and export, will create a .jpg image with your selected focus point, in sRGB jpeg standard color space
Refocused Image (.tif) – Choose a focus point and export, will create a .tif image with your selected focus point in 16 bit ProPhoto RGB color space
2D output resolution of 2450 x 1634 dependent on crop
3D formats
Red/Cyan 3D Image (.jpg) – Export a Red/Cyan 3D image (Red/Cyan glasses required)
Full Color 3D Image (.jps) – Export a full color .jpg Stereoscopic image.
Lightfield formats
Lightfield Camera Raw Image (.lfr) – Contains all light field data. Appropriate for backups.
Can be imported back into Lytro Desktop
Use this option for archival purposes, or whenever maximum picture fidelity is desired.
File size: about 50MB each
These files contain all the data captured by the Lytro camera.
XRAW – Contains all light field data AND camera calibration data.
ILLUM only
For sharing full living pictures on computer with Lytro Desktop that do not have pairing (calibration) data.
File size: about 100MB each
Editable living picture
Compress well
A good sharing option
Exports 7 .tif images, known as a TIFF stack, and a stack lfp (stack.lfp) file
You can edit these 7 TIFF images in your choice of 3rd party editing software (any that supports .tif images), and then reimport the stack lfp file back into Lytro Desktop. This will apply the edits made throughout the TIFF stack to your living picture.
You can read more about editing living pictures in 3rd party software here.
Editable Depth Map (Stack)
The Editable Depth Map (.png) is a layer of data that defines the distance of various surfaces from the lens of the camera, like a topographic map of that image.
Every living picture will have a unique depth map
When you export the editable depth map, 3 types of files will be created:
An editable depth map as a PNG
Multiple .tiff images with extended focus applied (entire image in focus)
A .txt file containing data information for the depth map
These files will automatically be placed in the same location as the exported editable living picture (TIFF stack)
Exporting Pictures
When viewing an individual picture (with or without Filmstrip), or when you have pictures actively selected within the Thumbnail Grid view, you can:
Export pictures to JPG or TIF:
- Select one or more pictures.
If you wish, you may Flag these pictures and/or create a new Album from these pictures to speed the export process.
Click once within each picture to choose the focus plane that will be exported for each picture.
The Individual Picture with Filmstrip view is ideal for quickly cycling through multiple pictures to choose a focus plane in each.
To export an entirely in focus JPG or TIF image, set the Aperture to f/16 using the virtual aperture control in the adjust toolset
If necessary, re-select the pictures you wish to export.
From the top-level “File” menu, choose “Export.”
You can also right-click the selected pictures within the Thumbnail Grid view and choose “Export.”
This alternate option to right-click is not available when viewing an individual picture
Type in the desired prefix for your exported pictures, e.g. “IMG_2013_July_11_”
Keep the default export option, JPG, or select “refocused image (.tif) to export a .tif image.
Click “Export.”
If multiple images were selected, your exported pictures will then be automatically numbered “_1”, “_2,” “_3,” and so on, after your chosen file prefix.
TIPS:
Exported 2D images can now be cropped, printed or manipulated in your favorite imaging software.
The native “Preview” application within OS X, and the native “Windows Photo Viewer” program in Windows, can be used to open and print any JPG file.
Lytro Desktop 4 itself cannot display or print exported JPG images; Lytro Desktop 4 only displays living pictures (LFP files).
Export LFP (Light Field Picture) Stacks, or RAW:
Select one or more pictures.
If you wish, you may Flag these pictures and/or create a new Album from these pictures to speed the export process.
If necessary, re-select the pictures you wish to export.
From the top-level “File” menu, choose “Export.”
You can also right-click the selected pictures within the Thumbnail Grid view and choose “Export.”
This alternate option to right-click is not available when viewing an individual image
Type in the desired prefix for your exported pictures, e.g. “IMG_2013_July_11_RAW_” or “IMG_2013_July_11_Stack_.”
Choose either:
- Lytro Camera RAW Image (.lfr):
These files contain all the data captured by the Lytro camera. RAW files are roughly 50 MB apiece.
Use this option for archival purposes, or whenever maximum picture fidelity is desired.
Editable Living Picture
Exports 7 .tif images, known as a TIFF stack, and a stack lfp (stack.lfp) file
You can edit these 7 TIFF images in your choice of 3rd party editing software (any that supports .tif images), and then reimport the stack lfp file back into Lytro Desktop. This will apply the edits made throughout the TIFF stack to your living picture.
You can read more about editing living pictures in 3rd party software.
Use this option to retouch your living pictures in alternate editing software, and restore them to an interactive living picture
Editable Depth Map (.png)
Every living picture will have a unique depth map
When you export the editable depth map, 3 files will be created:
Editable depth map as a PNG
.tiff image with extended focus applied (entire image in focus)
.txt file containing data information for the depth map
Information on editing depth maps is available here
These files will automatically be placed in the same location as the exported editable living picture (TIFF stack)
Use this option to manually correct any depth map errors that occur in your living pictures
Click “Export.”
Your exported pictures will then be automatically numbered “_1”, “_2,” “_3,” and so on, after your chosen file prefix.
Import LFP or RAW files:
Both LFP Stack images and RAW images can now be imported into any existing Lytro Library using the top-level “File” > “Import from Folder” option.
Note that the LFP / RAW images must be in a folder; for instance, you cannot import loose images from your Desktop.
Duplicating Living Pictures
Lytro Desktop allows users to duplicate their living pictures. This is a great tool to provide a backup of your original RAW images before making adjustments.
By duplicating a living picture file users can take one and make adjustments in Lytro Desktop, export as an ‘editable living picture’ stack to edit in 3rd party software, and reimport the image while still maintaining another original file, just in case.
There are two ways to duplicate a living picture in Lytro Desktop:
Method 1:
- Open Lytro Desktop (version 4.3 or better)
Select an image thumbnail (or multiple) from a library
Select ‘Picture’ in the top bar
Select ‘Duplicate’
The selected image(s) will duplicate
Method 2:
- Open Lytro Desktop (version 4.3 or better)
Select an image thumbnail (or multiple) from a library
[Contol+Click] or [Right-Click] the thumbnail
Select ‘Duplicate’
The selected image(s) will be duplicated
Exporting Animations
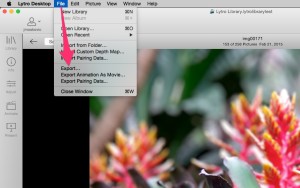
In Lytro Desktop 4 go to ‘File’ > ‘Export Animation as a Movie…’ on the top bar and follow the instructions below:
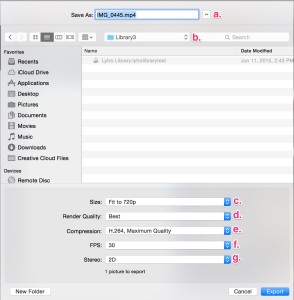
a. Name your movie by typing in a name. The file extension will be .mp4 by default.
b. Use the drop down menu to choose a location for your movie to save to. After exporting is completed, you can move the movie file to a different location.
c. Size: Choose Fit to 720p or Fit to 1080p. 1080p will be higher quality, but take longer to process and produce a larger file.
d. Render Quality: Choose Fast or Best.
-
We recommend using Fast, as the quality difference is minimal, and the processing time for best will be very long, even with a performance based machine.
Fast replicates the viewing quality and experience available on most computers.
Fast: expect 5-10 seconds of processing per second of animation, dependent on your computer’s capabilities
Best: expect 10 minutes per second, or more, on a performance based machine
e. Compression: Choose from H.264 Maximum Quality, H.264 Balanced, H.264 Maximum Compression, or PNG Series. The H.264 compression options are standard compression formats available for movie files.
-
H.264 Maximum Quality: Higher quality, larger file size
H.264 Balanced: Medium Quality, medium file size
H.264 Maximum Compression: Lower quality, smaller file size
PNG series: Exports 196 sequential still 2D PNG images
f. FPS: Choose from 1, 2, 6, 10, 12, 15, 24, 25, 30, 48, 50, or 60 frames per second
- 24fps is the standard for film
30fps is the standard for NTSC television
60fps is quickly becoming the standard for high quality HD video
g. Stereo: Choose from 2D, 3D Anagylph, or 3D Side by Side
- For more information on Lytro 3D output, see below.
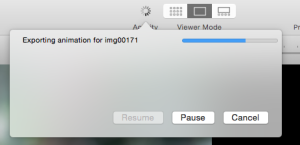
Once you have selected options for a-g, click “Export” to export the animation as a movie file. Once complete, navigate to the destination selected in option b to find and view the file. You can then play the video with any compatible video player – any video player that plays .mp4 files should work.
You can also edit the exported movie files in any 3rd party NLE (non-linear editing) software that is compatible with .mp4 files.
Lenticular Printing
Exporting a ‘Lenticular Print’ file from Lytro Desktop 4:
1. Select an image thumbnail and open it in ‘Single Picture View’
2. In the main menu, select File > Export… (‘Export’ can also be selected by [right-clicking] or [control-clicking] the thumbnail)
- Select a file name and location
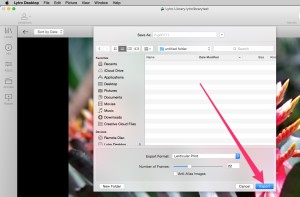
For ‘Export Format:’ select ‘Lenticular Print’
‘Number of Frames’ selects how many views are generated between the minimum and maximum perspective view points. The range is between 10 and 50 images. More images will result in a smoother experience overall.
‘Anti-Alias Images’ smoothens the experience of viewing a lenticular print by averaging frames to reduce artifacts that can be seen when a user’s viewpoint changes. This feature results in a slight loss of resolution but is recommended when exporting a lenticular file using over 12 frames.
3. Select ‘Export’
4. Desktop 4 will process the exported file
5. Send resulting file to a professional printer that can create lenticular prints
3D Output Overview
The Lytro software ecosystem supports various 3D options for you to explore and share with your friends and family.
What you’ll need to view your pictures in 3D
We support 2 different kinds of 3D output: Anaglyph, aka Red/Cyan, and Side-by-Side.
Anaglyph – To view Anaglyph output, all you need are a pair of Red/Cyan glasses. These can be had for cheap and are widely available on the internets, just search for “red cyan 3d glasses”.
Side-by-Side – To view Side-by-Side output, you’re going to need a 3D TV and the glasses that came with it. We don’t officially support 3D computer displays, but that doesn’t mean it won’t work for you; lack of real industry standards means that we just can’t guarantee it.
Got a 3D TV? Enter into 3D mode (your remote probably has a ‘3D’ button) and select Side-by-Side viewing from the menu system. Put on your TV’s 3D glasses and enjoy.
Lytro Desktop Software (Mac or Windows)
With Lytro Desktop 3.1.0 or higher, you can view your living pictures in 3D, either in Anaglyph (Red/Cyan glasses required) or Side-by-Side (3D TV Required).
Lytro Moble App (iPhone or iPod)
With the Lytro Moble 1.2 or higher, you can wirelessly transfer pictures from your Lytro Camera to your supported iOS mobile application, and then export and view them on your mobile device (Red/Cyan glasses or 3D TV/Viewer required).









Recent Comments